The concept of using miniatures in cinema to create an illusion of a real object has existed since the inception of filmmaking.
When circumstances do not allow us to carry out shoots in real locations with real objects, it necessitates the scenario of miniature shooting. It may be due to technical reasons, safety restrictions, economics of production, time constraints, or the non availability of the actual object or location.
Requirement for miniature shooting continues to be relevant even today for most of the CG works like compositing with graphics and real objects.

TITANIC – The biggest complete miniature of the ship – 45 feet

THE LORD OF THE RINGS: THE RETURN OF THE KING
The miniature of The city of Minas Tirith 14 feet tall and sprawls some 30 feet wide.
Success of working with miniatures depends on how they are created with good understanding of aspects like perspective, viewpoint, field of view, lighting, lenses, depth of field, scientific methods for fixing shoot frame rates, exposure component and size ratios among many others. The production design plays an important role in shooting with miniatures. Better understanding of the technique benefits not just the cinematographer but also the production designer and special effects supervisor.
Let us start with analysis of how do we understand the size aspect of an object in a static image.
Whenever image of a well known object is shown, there should not be any problem in understanding its real size. When unknown object is shown along with known reference objects, we compare it with the known objects and understand its size.
Interestingly, even without a reference object we can get an idea about the size of the object.
Look at these two pictures – Fig. 01 and Fig. 02
Fig. 01 fakes/ appears to be a toy, in spite of non-diverging parallel shadows with same intensity of hard light everywhere.
Fig. 02 appears to be real playground.
Then what element in Fig. 01 gives the impression that makes it to appear like miniature?

Fig. 01

Fig. 02
Now look at Fig. 03 and Fig. 04
Irrespective of whether the known reference objects are present or not, we understand that all elements in this picture are very much smaller in size. Although in real-life, we may not get to see these objects in such a close proximity without magnifier, we do see these images very often.

Fig. 03

Fig. 04

Fig. 05
Look at Fig. 05.
Though features of the “Rubber Duck” are similar to a toy duck, we rightly understand that it is really very big in size.
Whenever we see an object with completely defocused background and defocused foreground, we get impression that the object is smaller.
(Fig 01, Fig 03 and Fig 04)
In contrast, whenever we see an object with background and foreground completely in focus, we get the idea that the object is really a big one.
(Fig 01 and Fig 05)
So, the important aspect to be considered when we photograph a miniature with an intention of making it to appear as big as the original, is to work against the factors that go in favor of showing as miniature. In other words, work against shallow depth of field.
Point 1 – Matching Depth of Field
Depth of field (focused range in the object field) in miniature is to be maximum but not less than equivalent depth of field that matches with the size ratio.
If we consider size ratio of 10:1 for the real and the miniature, and depth of field for the real scene is 10 meter, then for depth of field for miniature should be at least 1 meter or more.
If nearest point of focus for the real object is 5 meter, then nearest point of focus for the miniature will be at 0.5 meter or less.
This can be achieved only if we can increase f/no. matching with the size ratio. That is, if you are going to shoot the miniature with f/22, then it will show up as if the real scene is shot with f/2.2.
This can be achieved only if we can increase f/no. matching with the size ratio.
Other aspects to be looked into are as follows. If it is sunlit scene, shoot under sunlight with proper fill. But be aware, sun position will keep changing. If it is interior and artificial light sources are to be used, keep the illumination level same for the entire field preferably using one powerful hard light source. Position it as far away as possible in order to reduce the effect of light fall-off due to inverse square law and to minimize diverging shadows. Use soft fill all around. Match color temperature to daylight.
If it is night effect, multiple sources can be used; all practical lamps can also be miniaturized, can be dynamic, and can be with different colors if the situation suits.
Whenever we composite the miniature image with foreground and background plates, we should ensure matching the view point, lighting and color balance in order to believe that all are part and parcel of the same scene.
Whatever focal length lens that can be thought of for the real object picturisation, the same focal length lens only needs to be used for the miniature also. What is important is matching the view point of the real scene. If you use lens wider than what is required, the extra area needs to be cropped. This may degrade the image quality.
Miniature shooting is nothing but creating an illusion of something that does not exist at the time of shooting. It is also like magic, but can be easily understood by any practicing cinematographer. Whatever we have discussed so far are meant only for static scene without any elements of the scene making any movements.
But our works are concerned with motion picture photography. Time involved by miniature object, to make equivalent displacement (equivalent displacement is the proportionately reduced distance), is lesser compared to real object. So we have to work for stretching the time, so that during the projection time involved will be equal to real time. How do we do it?
We know that motion picture is nothing but a continuous slide show. Only difference is that the interval that happens between any two slides are so short that we fail to notice it. Though all the slides are segmented still-pictures of a continuous event, we do not see them as images of still pictures, but as continuous motion happening. We are aware that whatever movement we understand is actually due to the illusion we call it as phi-phenomena or optical imagination. When we can create an illusion of real motion, why we cannot manipulate motion.
Hence it is all about manipulating motion by recording the miniature with higher frame rate than the projection frame rate.
There are two types of movement, they are different to each other, hence need to be handled differently. But aim is to match the screen time with the actual time.
One is the displacement of the object falling from a height toward the ground due to the earth gravitational pull and second is the displacement of the object due to his own speed.
In the case of an object falling, the displacement and the rate of change of displacement are governed by the height and the acceleration due to gravity. It is (they are) same for all objects whether they are big or small. Since the miniature version involves less height matching its size, time it takes to reach ground is less compared to the real one.
Displacement and rate of displacement for any object, not due to gravity, is controlled by its own speed and that need not be same for all the objects.
When a real object falls from a height of 100 meters, it takes about 4.5 sec. to reach ground. If miniature replica is 100:1 version, fall from 1 meter height will be for the duration of only 0.45 sec. Unless miniature-fall also occupies screen time of same 4.5 sec., the viewers do not believe it is the real object’s fall.
Whenever an object falls from a height, time taken to reach the ground is governed by height involved and acceleration due to gravity. Hence miniature-fall-time for shorter height is lesser compared to real-object-fall-time for more height. How much miniature-fall-duration needs to be stretched is decided by the ratio of real-object-fall-time with miniature-fall-time.
Fall-time is worked out in both the cases using this equation.
d = 0.5 x a x t x t
where,
t = time in seconds
d = height in meter
a = acceleration due to gravity i.e. 9.8 meter/sec/sec
Then t = square root of (d / 0.5 / a)
For an example, if we have a real building with a height of 9 meter and a miniature replica 1 meter, then size ratio is 9:1
Fall time for an object from 9 meter height =
square root of (9 / 0.5 / 9.8) = 1.36 sec
Fall time for the miniature object from 1 meter height =
square root of (1 / 0.5 / 9.8) = 0.45 sec
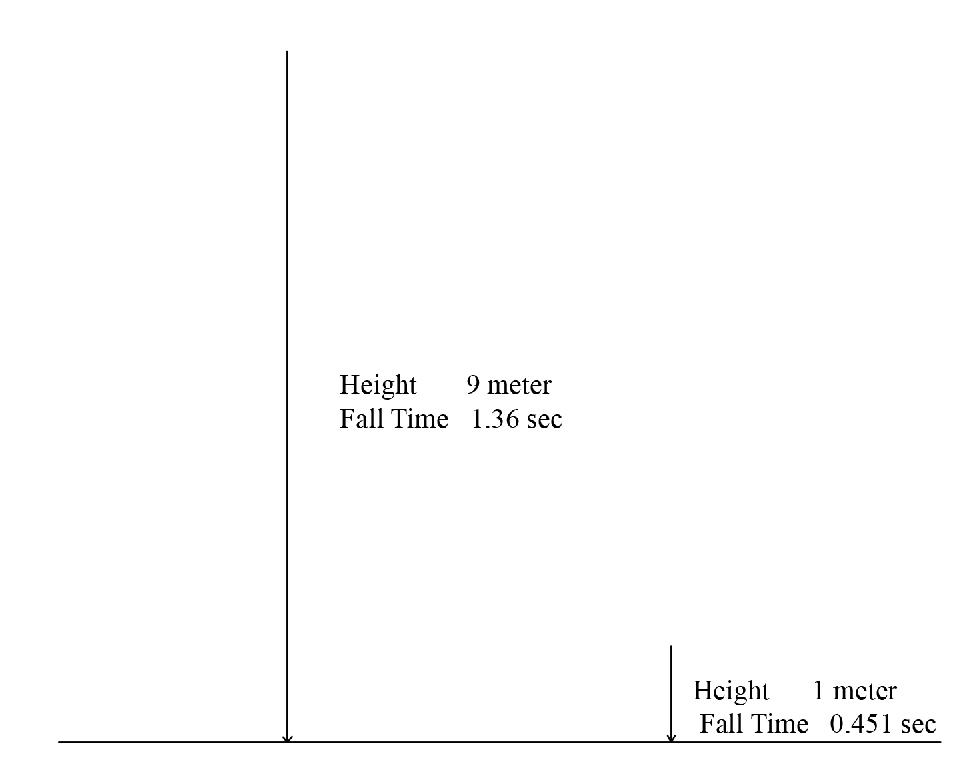
Time ratio = 1.36 / 0.45 = 3:1
What it indicates is that during the projection, picturised miniature-displacement-time also should be 1.36 sec. to match with the real.
If screen time required is 1.36 sec, then recording frame rate is increased by 3 time of project frame rate i.e. 24 x 3 = 72 frames/sec
Screen time = 72 x 0.45 / 24 = 1.35 sec
Since the constants that are used in calculating the fall times are same for both, the real object and the miniature object, if we calculate the square root of the size ratio, the same can be used to multiply the project frame rate to get recording frame rate.
Point- 2 Matching fall-time for miniature with fall-time for object in reality
Screen time occupied by the miniature-object-fall, for the proportionate height,
should be equal to the time occupied by the real-object-fall, for the actual height.
This can be achieved if the miniature-fall is slowed down by the factor that is equal to square root of the size ratio.
= square root (real size / miniature size)
= square root (9 / 1) = 3
square root of size ratio = fall-time ratio
Hence the recording frame rate is increased by multiplying the project frame rate by the factor of fall-time ratio to stretch the screen time to match the real time
So far we have succeeded in two technical issues; one is matching the depth of field and second is matching fall-time duration. One more technical issue also needs to be taken care. That is matching the time of displacement-duration of the miniature with that of the real object moving with its own speed.
What it means is that time taken for the miniature object to travel an equivalent distance (proportionately reduced distance) should be equal to the time taken for the real object to travel the actual distance.
Assume the real object moves at a speed of 4.5 km per hr. This works out to be 1.25 meter/sec. This distance is reduced in miniature version to its size ratio. In our example it is equal to 0.139 meter. If we are going to record miniature movement at 24 frames/second and project frame rate is at 24 frames/sec, displacement time for every 0.139 meter will take 1 sec. This is equal to travel of the real object for a distance of 1.25 meter.
The real object speed = 4.5 km/hr = 4.5 x 1000 / 60/ 60 = 1.25 meter/sec
Size ratio is 9:1
Then the miniature displacement = 1.25 / 9 = 0.139 meter/sec
But we have already worked out our recording frame rate as 72 frames per second. If we record at 72 frames/sec and project frame rate is at 24 frames, screen time occupied by the miniature object to cross its equivalent distance of 0.139 meter will be 3 sec. This makes the miniature movement to appear 3 times slower.
How to make the miniature to take only 1 sec to cross 0.139 meter?
Make the miniature to travel at the speed 3 times faster than 0.139 meter/sec. Then speed is modified as 0.417 meter/sec.
During projection, at 24 frames/second, movement is slowed to 3 times. Then displacement is 1/3 of 0.417 = 0.139 meter/sec.
Hence 1 sec time taken by the miniature movement of 0.139 meter is equal to 1 sec time taken by the real object for the distance of 1.25 meter.
Point- 3 Match the duration for the miniature move (of equivalent distance) to the duration for the real object move (of actual distance).
Speed of the miniature object at the time of recording =
Speed of the real object / size ratio x recording frame rate / project frame rate
= 1.25 / 9 x 72 / 24 = 0.417 meter/sec
Time taken for the real object to cover 1.25 meter is 1 Sec
Screen Time for the miniature object to cover
the equivalent distance of 0.139 meter = 3 / 0.417 x 0.139 = 1 sec
Now let us work out for an example
Point 1 – Matching Depth of Field
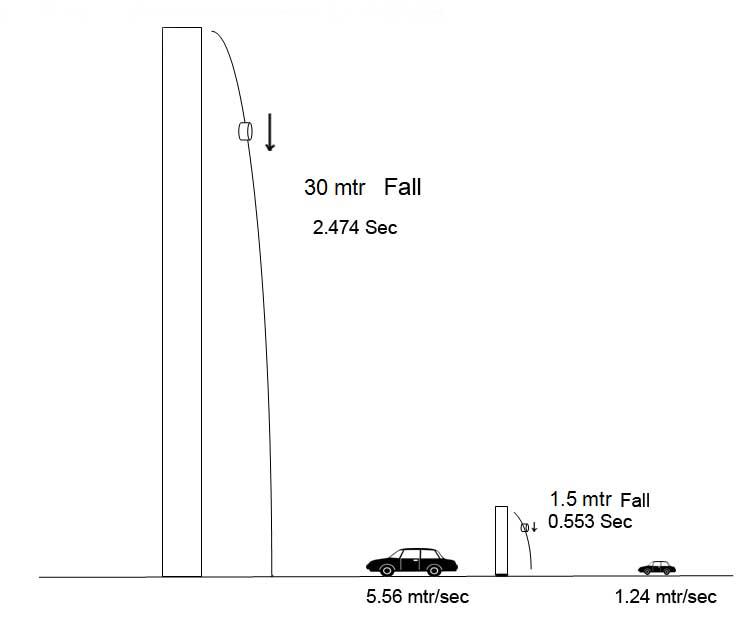
Think of a situation where we have a miniature replicating a high-rise-building- housing complex. Height of the tallest building is around 30 meter. Miniature version measures 1.5 meter. Then Size ratio is 20:1 (30 / 1.5 = 20).
If we want to match the depth of field of miniature to that of the real scene, miniature depth of field is equal to depth of field of the real scene reduced by 20 times. If we can work with f/22 (possible highest f/no. available in many of the cine lenses), this matches depth of field obtained with f/1.1 in real situation.
Assume we use a lens with 18 mm focal length.
Camera view point looking down at a distance of 2.25 from the building
F/no. 22
Focus is set at 2.25 meter
Depth of field for the miniature is from 0.46 meter to infinity
This is equal to depth field from 9.2 meter to infinity for the real scene
(As if f/no opened up for f/1.1 (22 / 20 = 1.1)
Point 2 – Screen time of miniature-falling object should match with actual time of real object falling
Time ratio for the real object falling and the miniature object falling in our case
= Square root of the size ratio = √20 = 4.47
Hence miniature screen time is to be increased from its actual time by 4.47 times.
For this, miniature recording frame rate is to be increased from projection frame rate by 4.47 times.
Hence recording frame rate = Projection frame rate x 4.47 = 24 x 4.47 = 107.28 frames/sec
But when we increase the frame rate, shutter speed increases by 4.47 times (Shutter speed factor is directly proportional to frame rate). If our project shutter speed is 1/50 then revised shutter speed is about 1/225 sec.( 50 x 4.47 = 223.5). This results in underexposure. Exposure can be compensated with manipulating any of one, or all of f/no., illumination or ISO. But f/no should not be compromised since it reduces equivalent depth of field. We have to either increase ISO value or illumination or both of them. If you are increasing illumination alone, then illumination needs to be increased by 4.47 times. This works out to be about 3500 foot-candle. If ISO is increased, ISO 3600 is required. Increasing ISO may increase the noise in shadow area.
Virtual height of the real object : 30 meter
Height of the miniature : 1.5 meter
Size ratio : 20 : 1
f/no. chosen to work with : f/ 22
Illumination requirement : 800 (Assuming IS0 800, shutter speed 1/50)
(Note: when we increase frame rate, then we have to revise the shutter speed or llumination level or both)
View point distance with
respect to focused object. : 45 meter
View point distance for the miniature : 45/20 = 2.25 Mtr.
Focal length considered (S35) : 18 mm
Recording frame rate : 107 frames/sec
Point 3 – Screen time of any miniature object moving on its own speed should be equal with the actual time of real object moving on its own speed.
Let us think of a car is to be portrayed moving within the frame at a speed of 20 km/hr. (5.56 meters/sec.). In miniature version, displacement of 5.56 mtr/sec is to be reduced matching with the size ratio.
Miniature displacement = Real object displacement / size ratio
= 5.56 / 20 = 0.28 meter / sec.
Since we have already decided our recording frame rate to be 107 frames/sec.
Speed of 5.56 mtr/sec would appear as 1.24 mtr/sec.
If we increase the speed of the miniature object 4.47 times (Recording Frame rate vs Projection frame rate i.e. 107.28/24 = 4.47), it would result the miniature object speed as 1.25 meter/sec. Then screen time of the miniature movement would match with the real object movement of 5.56 mtr/sec.
Speed of the miniature object movement = Speed of the real object /size ratio x Frame rate ratio = 5.56 / 20 x 107.28 / 24 = 1.24 meter/sec
– Gnanasekaran M.N.
Super.. 🙂
thank you for writing this! great insights indeed!
Amazing sir, thank you
Very nicely explained, thank you 🙂